Wild Green Garden Consulting
Join me on Facebook
  • Home
  • Consultations
  • Permaculture Design
  • Yard Transformations
  • Videos and Tips
  • Blog
  • Workshops
  • Wild Things
  • Resources
  • Projects
  • About
  • In the News

Sauerkraut – Easy Homemade Probiotic

2/3/2022

 
Picture
Fermenting vegetables is a great way to preserve surplus, and the health benefits are widely recognized. Sauerkraut that has not been boiled or made with vinegar helps increase your intake of Lactobacillus bacteria that support gut and digestive health. It’s easy to make and cabbage is less expensive than many other veggies.
 
The following description is from an online article I found a few years ago. I really like the fact that you can make smaller batches in a 1 Quart Canning Jar throughout the winter – no need for a large, expensive crock.
 
Sauerkraut for 1 Quart (1 Litre) Canning Jar
800 grams (1.75 lbs) of cabbage and other grated veggies (see below) – approx. 4 cups total
1 Tablespoon salt (sea salt if available)
a bit of water, if necessary
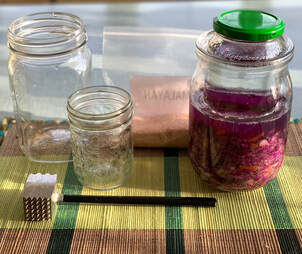
1 wide mouth canning jar – 1 quart (1 litre)
1 small jar that just fits inside the large jar
meat tenderizer mallet or other pounding tool
sharp knife and cutting board (or veggie mandoline)

Instructions
  1. Veggies for flavoring: You can add some grated carrots or radishes to the bowl, as well as 1-2 chopped cloves of garlic if you like. Add these extras to the bowl before adding sliced cabbage, for a total weight of 800 g.
  2. Cabbage: You can use a medium sized purple or green cabbage. Cut the head in quarters and thinly slice the cabbage, adding it other grated veggies if desired. Add cabbage until you have a 800 g of veggies or approx. 4 cups.
  3. Salt: Sprinkle 1 Tablespoon of salt over the sliced and grated veggies.
  4. Pounding: It’s helpful to gently pound the veggies with a meat tenderizer mallet (or similar) to release juices that will form a brine with the salt. This happens after about 10 minutes of stirring and lightly pounding.
  5. Other flavours: Before packing the veggies into the jar, you can also add a bit of grated ginger or 1-2 tablespoons of caraway seeds.
  6. Packing the jar: Use a large serving spoon to fill the jar with the veggie mix. Press the mix down as you go to try and submerge the veggies with the brine. Leave about 5 cm of space from the top. If there the juices do not cover the veggies, you can add a couple of tablespoons of water.
  7. Place the smaller jar inside the large jar, pressing down gently. Fill the small jar with some water to keep the cabbage mix submerged.
  8. Fermenting: Let the sauerkraut ferment at room temperature (I set mine in a bowl in the pantry, in case the is a bit of overflow). Within a day or two (depends on room temperature), it will start to form bubbles and it will develop stronger smell. After about 2 weeks or more, take out the small jar and smell the sauerkraut. Unless it has a putrid smell, it is ready for tasting. Place a lid on the jar and move it into the fridge. It will keep for weeks.
 
Note: I have only had one bad batch; the fermented cabbage looked slimy and the smell was off, definitely not like proper sauerkraut. Be sure to use your senses before tasting and ask for a second opinion if you feel something is not right.

For more information, visit Cultures for Health

Squash Adventures

9/8/2020

 
Picture
Squashes are great for easy storage; they keep well into February/March in a spare room around 16 C for me. I love making soups or roasting squash in the oven. Growing squash has been rather challenging in the last few years due to increased wind and cold persisting into June.

Protecting the seedlings early in the season is really important. I use plastic domes with a vent hole from the dollar store until they get too large. By then it has hopefully warmed up and the winds eased. In the city, this is often the case, but in more exposed areas, wind protection is required. My gardening buddy lent me a heavy duty plastic ring – the top of a food grade plastic barrel converted to a rainbarrel (see image above). The ring is almost 2 feet in diameter and open at the top, blocking lots of wind but allowing the sun to warm the growing squash seedling.

The next challenge is nutrients (and some hot days!). In my community garden, the rich clay soil provides all the minerals for good fruit development. In my home garden, I planted two squashes into an 8-month old compost pile. While the plants were super happy in the protected yard and vines and leaves grew many feet, most of the baby squashes shriveled up and fell off. There have been many bumblebees around, so I don’t think it’s a problem with pollination. While I don’t have any data, my feeling is that the partially cured compost is not rich enough in calcium and other minerals, plus the summer has been very cool. I added a calcium/magnesium supplement to the watering can a couple of weeks apart. After some wonderfully hot days, 2-4 small squashes developed properly. It’s possible that with time, the roots also travelled far enough into the clay below the compost pile to find what they needed.

Keeping squashes from strangling other plants is another job. In my small home garden, I created wire tunnels, a sort of bridge for the squash vines, leading them over and between other plants. Squash tendrils are very strong and grab onto any flowers or shrubs. My gardening buddy sent a photo of a great vertical trellis created with 6”x6” wire mesh (used to strengthen concrete; available from Home Depot for example). At my windy community garden, keeping the squashes low to the ground is better. So I place straw under the vines and try to keep them in the beds to avoid stepping on them.

As we creep towards shorter days and cooler nights, mildew inevitably makes an appearance. It’s best to keep the squashes well watered and fed. I give them a little bit of liquid fertilizer or seaweed fertilizer about once a week. Also, it’s best to avoid splashing soil onto the leaves. Some research suggests that spraying a mix of milk and water onto the leaves provides some protection. I use a mix of 25-30% milk into water and spray the leaves every few days. For more info, visit this site.

My favorite squashes to grow have been Red Kuri (long vines, large sweet fruit), Gold Nugget (compact plant, small orange fruit), and Gem squash (very vigorous, small green fruit). Maybe next year I’ll try out a new one. Let me know if you have a favorite that grows well in our area.

Red Kuri squash advancing on top of a wire tunnel
6"x6" wire trellis supports these squashes
Gem Squash
Picture
Red Kuri, Gold Nugget and Butterbush harvested rather pre-maturely on Sept 4 due to threat of frost.

Sweet Potatoes in Edmonton

1/11/2019

 
Last winter, I had some small Georgia Jet sweet potatoes left over and they started sprouting in January (see blog post below). I pulled off the small plants ("slips"), and potted them up in containers filled with potting mix. I managed to overwinter them until spring, placing them under fluorescent lights in March.

In the summer of 2018, I decided to compare the growth of sweet potatoes both in a very large container on our deck, and some in my community garden plot. What a difference! I had “huge” sweet potatoes in the containers filled with 75% potting mix and 25% compost, with an addition of some organic veggie fertilizer. Two plants yielded about 8 beautiful potatoes. It was certainly not a bumper crop, but really enjoyable.

By comparison, the sweet potatoes in my community garden plot were skinny and small. The soil is rich clay soil that produces many great veggies suitable for our short season. For sweet potatoes, it is too heavy and takes too much time to warm up in the spring and after rain. 
Therefore, I will grow sweet potatoes again in large containers in the sunniest area of my yard.

After the tuber harvest and a frost that killed my sweet potato foliage, I decided to plant one of the fibrous roots into a pot. Sure enough, it eventually leafed out again. I took some "slips" and planted them in 4 inch pots. The plants grew very nicely, but I realized that keeping these plants alive from December to May is not realistic. I gave them to a Little Green Thumbs teacher, and she planted them with her students into earthboxes in her indoor garden. A recent photo shows the growing very nicely!

Want to try your own sweet potatoes? A friend has already put in our order for slips from Mapple Farm (NB) as they sell out fairly quickly. Other sources:

Burts Greenhouses (ON)
Gelert Garden Farm (ON)
Sage Garden Greenhouses (MN)
Veseys (PEI)

Update on Unusual Food Plants

9/23/2018

 
Picture
I was excited to try some new plants, such as Crystal Apple Cucumber, Edamame soybeans, Ground Cherry, Golden Sweet Peas, Diana Watermelon and Styrian Pumpkin. It would be unfair to say these plants are not worth growing, given the strange weather patterns this year.

My Crystal Apple Cucumber transplant was not happy with the wind, so I put a few extra seeds in the ground. I ended up with a tangle of vines (not sure I agree it's less scrambly than Lemon Cuke), and most of the cucumbers were bitter! My Edamame beans rotted in the soil in a couple of locations and later seeded plants only set a few small, dry pods.

As for Aunt Molly's Ground Cherry (aka husk tomato or physalis), the plants in the garden did very poorly. The plant in my earthbox is much larger, likely because it's protected on the deck and received more consistent moisture in the earthbox. Production was a bit late, so I rolled the plant into the garage during our early cold nights. The few handfuls of ground cherries have been lovely and they keep and continue to ripen for a long time in the kitchen.

The Watermelon and Musk melons also did not fare well this summer; the plants simply failed to thrive and the 2 melons on each plant were not very sweet. Another disappointment were the Golden Sweet Peas. The peas grew well, looked pretty and we enjoyed some in stir fries. The peas were not very tasty fresh and I had no luck harvesting dry seeds - the pods became twisted and had some mildew late in the season.


WHAT TO DO??? Next year will hopefully be better, so I will give it another try. Gardeners and farmers must be the most hopeful people. In the meantime, I was happy with the bounty hiding under the jungle of squash leaves! I had to pick the Styrian pumpkins before they turned yellow, but hopefully they will ripen nicely in the house. And fortunately, there are plenty of carrots, beets and potatoes, all good prairie staples.

Picture
An unexpected winner was Selma Fino Bulb Fennel. I purchased the seeds from West Coast Seeds and planted a handful of seeds in potting mix on March 23. I placed the seedlings under fluorescent lights until hardening off time and eventually they went out into the garden bed May 26. I also seeded some fennel seeds between the transplants for a later crop. In early August, we had some very large bulbs to harvest.
The seeds I had planted in May developed into nice seedlings which I transplanted into an empty bed on June 21. The plants did really well and produced beautiful, tasty bulbs that kept well into September in the garden. I used the bulbs fresh in salads, lightly sauteed in omelettes, and I dried many of the fronds for later use in soups.

Early Edible Greens

5/26/2016

 
Here are some greens and perennial herbs you may want to consider adding to your yard this year – Sorrel, Welsh onion, Lovage, Orach, Lemon balm and Oregano.
Garden Sorrel: This perennial comes up in April and is a welcome addition chopped into a salad. It is a bit sour and lemony. You can also make a soup. Many garden centres sell plants.
Welsh Onion: A perennial green onion that self-seeds (remove seed heads to avoid too many plants). You can get seeds from Richters, Brother Nature, A'bunadh Seeds and maybe local garden centres.
Lovage: This perennial plant is about 3 feet tall and wide (flower head goes up to 6 feet), so you’ll have way more than you need for soups or as a herb. It’s a lovely plant though, and you can cut it a couple of times to add to the compost. Here is a blog post with recipes, from a fellow European who also knows it as Maggikraut. Seeds and plants may be available locally or you can order seeds from Richters or West Coast Seeds.
Orach: This plant is not perennial but is considered an annual weed and can be found in the river valley. It needs to be controlled as it self-seeds vigorously, but it does not spread by roots. The stalks are about 5 feet when left to grow, and you can find both green and purple orach. I grow it in a large box and pinch it back regularly. It is delicious fresh or lightly steamed. When we have other plants to eat and it wants to flower and go to seed, I allow some of the seeds to drop for next year, and compost the rest. Collect seeds in the wild or order them from one of these companies.
Lemon Balm and Oregano: These herbs are easy to grow. Lemon balm makes lovely tea and can be added to salads in small amounts. Oregano comes back even in the toughest conditions and moves to places where it like to grow. Both herbs are great for pollinators.

Experimenting with Parsnips

4/2/2016

 
Picture
Harvesting at the end of March is a bit unusual, but just two days ago, I dug out at least a dozen perfectly healthy parsnips. I planted the seeds on May 5, 2015, spaced in a block pattern about 10 cm apart, with 2 seeds in each planting hole. Once the seedlings were nicely growing, I snipped off extra plants. These plants really did not get a prime spot in the garden or any extra care, yet they grew without trouble. While the beets and carrots had to be protected with netting from pesky house sparrows that nibble tender leaves, the parsley did not seem to appeal to them.

In mid-November, after heavy frost had already flattened the leaves of my parsnips, I placed a thick plastic bag of leaves on the plants, and snow came soon after. During some warm weather in January, I thought I might be able to dig some out, but the parsnips appeared to be frozen into the ground. I sure wondered if they would be mushy when I could finally dig them up, but surprise! They look lovely, along with some golden beets that also made it through the cold unharmed.

Time for Garlic

9/11/2015

 
Garlic is harvested when the stalks of the plant are drying up and have turned brown.
Dig up your garlic and store the entire plant in a dry location (i.e., your garage) for about two weeks. Decide how many bulbs you will eat and how many new bulbs you want for next year. Each clove will make a new bulb, so reserve enough bulbs to plant this fall. Since you should rotate your crops, decide where you will plant the garlic. Remember, this bed will need to be well marked and can’t be disturbed for a full year.
PictureHarvested garlic; straw mulch reduces weeds and moisture loss.
In late September, break apart your planting bulbs and plant each clove with the pointy end up, approximately 15 cm (6 inches) apart and about 7 cm (3 inches) deep. Water them a couple of times if it’s very dry and it helps to mulch the garlic with straw. If you decide not to mulch, you can seed some lettuce between the garlic before snow falls and you will have an early crop of cutting lettuce.

Haskap Berries and Harlequin Bugs

7/3/2015

 
After 3 years of impressive growth, I’m very happy with my Borealis and Cinderella haskap (honeyberry) bushes. The shrubs are now 4 feet tall and wide, and will likely grow another foot or so. This year I was able to harvest about 3 litres of fruit, most of which I spread out on cookie sheets to freeze. I have made a few mini-tarts and we have also enjoyed them fresh with ice cream and mixed into pancake batter.
It’s a good idea to protect young plants in the winter with wire cages as hungry rabbits go after the stems. Another critter that loves the shrubs this summer is the Wee Harlequin Bug, aka Twice-stabbed Stink Bug.

When picking berries, I ended up with bugs in my hands and noticed that many berries were soft, indicating the bugs had been sucking out the juice. I have also been finding Wee Harlequin Bugs (see photo above) on many flowers, often breeding back to back. Apparently they love seeds but from what I have observed, it seems that they cause damage to developing flowers, which then dry up very quickly.

A while ago, I found eggs on my tomato stems – they are yellow, hard and in neat rows. On some of the developing flowers, I found tiny larvae in search of food and again, the flowers have already dried up. Some of my ripening tomatoes have a yellow, soft patch, more evidence of Wee Harlequin Bugs sucking juice.

So what can we do? When I catch a few bugs while doing watering or other garden care, I place them on a hard surface and squish them with my shoe. I have also gone out with a bucket of soapy water and tried to collect them en masse. (One of my organic gardening students took the shop vac to suck them off the raspberry bushes – pretty creative).

According to online info (see Rob Sproule’s article), the bugs will try to overwinter under leaf litter and mulch. As a strong advocate of mulching (since it does wonders in drought years and to feed the soil!), I’m not sure that I will have the heart to “remove plant litter” from my entire yard. It’s likely a good idea to dispose of any heavily infested plants and cut off seed heads that are not being saved.

Musk Melon in Edmonton

10/6/2014

0 Comments

 
Picture
Can you grow melons in Edmonton? Yes, in a protected spot we can grow musk melons (cantaloupe) and possibly other types. Last spring, after turning the compost pile a few more times and moving it to a different location, I mixed some partially finished compost with potting mix and enclosed it with two layers of old bricks for a temporary circular bed.

I purchased a musk melon seedling at a local garden centre and planted it into the circular bed around June 1. We had some very cool weather, so I protected it with a plastic cloche in the same way I protected my zucchini.

In late August, the melon had sprawled all over and I located 5 melons. Unfortunately, I had to bring them inside as we had a forecast of frost and some snow on September 7. This past week, the melons finally looked and smelled ripe enough to try – although not overly sweet, they were a nice home-grown melon treat.


0 Comments

Salad Burnet and Strawberry Spinach

7/29/2014

 
Picture
I like experimenting with edible plants in my garden and this year, I decided to seed Salad Burnet and Strawberry Spinach (aka Strawberry Blite) to add to our salads. I started both plants indoors in early May and transplanted them outside around mid-June. In late June, I left for a trip to Switzerland and was pleasantly surprised how much the plants had grown in three weeks, and that they were ready for picking!

Salad Burnet is a perennial plant native to Europe (I actually found it while walking in a meadow near my home town in northern Switzerland). It is marginally hardy but some previous plantings in other parts of my garden have mostly survived for several years. I purchased the seeds at Seedy Sunday a few years ago from Brother Nature, www.brothernature.ca. This spring I seeded another batch indoors in early April. I decided to plant the new seedlings close to my honeyberry shrubs as that bed is in part shade and fairly moist. In mid-July, the plants were fully grown and already started making seed heads. The leaves have a slight cucumber flavor and I also think they taste slightly nutty. They are best harvested when the leaves are young and soft. Although we have been enjoying them in salads in July, the leaves will soon be a bit tough. Salad Burnet stays in a nice clump but re-seeds slowly.

Strawberry Spinach is a native plant of Alberta and it was used by the First Nations for food and the red fruit was also used as a dye. The plant is in the Goosefoot family, so it’s related to Lamb’s Quarters. The leaves and fruit are edible, though they contain oxalic acid and should not be consumed in substantial quantities. The seeds I purchased are from McKenzie Seeds purchased at a local garden centre. I started the seeds indoors in mid-April and transplanted them out into the garden some time in June. Since our return from holidays in mid-July, we have been adding the “berries” to salads. The fruits do not have a lot of flavor – I would describe them as slightly juicy and nutty. When added to a spinach salad, they look like a bit like strawberries and also release tiny black seeds similar to poppy seeds. It’s certainly a conversation piece!

A word of caution – although the seed packages states that this annual plant re-seeds, some online research has brought up the following comments “May re-seed vigorously”. Yikes. I will be harvesting a few more berries and the rest will go in the garbage, to be composted by the City. I know I have dropped quite a few fruits already and do not want my veggie plot taken over by this plant next year. It might be safer in a large pot on a patio where stray seeds can be swept up. The lesson? Know your plants before bringing them into your yard!


Picture
Picture
<<Previous

    Author

    Claudia is exploring and sharing permaculture ideas in Edmonton.

    Categories

    All
    Cold Frame
    Composting
    Container Growing
    Extending The Season
    Extreme Weather
    Farming
    Food
    Fruit Trees
    Harvest
    Herbs
    Indoor Growing
    Lasagna Garden
    Native Plants
    Perennial Greens
    Permaculture Principles
    Pests
    Pollinators
    Root Cellar
    Row Cover
    Seeds
    Sheet Mulching
    Soil Tips
    Supporting Plants
    Vegetables
    Wildlife

    Archives

    March 2022
    February 2022
    October 2021
    September 2021
    March 2021
    September 2020
    June 2020
    April 2020
    March 2019
    January 2019
    September 2018
    March 2018
    August 2017
    July 2017
    May 2017
    April 2017
    February 2017
    January 2017
    November 2016
    July 2016
    June 2016
    May 2016
    April 2016
    March 2016
    January 2016
    December 2015
    November 2015
    September 2015
    July 2015
    May 2015
    February 2015
    October 2014
    July 2014
    June 2014
    March 2014
    December 2013
    October 2013
    June 2013
    May 2013
    January 2013
    July 2012
    June 2012
    March 2012
    January 2012
    September 2011
    June 2011
    May 2011
    February 2011
    January 2011

    RSS Feed

© 2022 Wild Green Garden Consulting
Sign Up     Home     Consultations     Permaculture Design