Wild Green Garden Consulting
Join me on Facebook
  • Home
  • Consultations
  • Permaculture Design
  • Yard Transformations
  • Videos and Tips
  • Blog
  • Workshops
  • Wild Things
  • Resources
  • Projects
  • About
  • In the News

Regrow Living Lettuce

3/20/2022

 
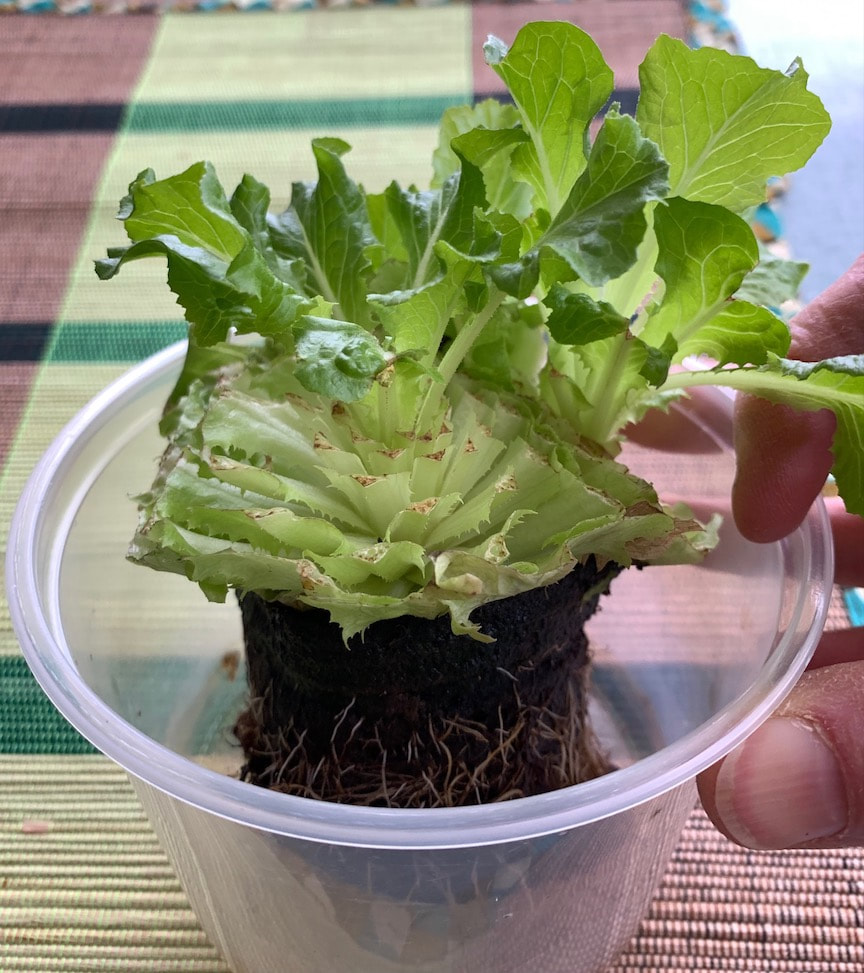
If you purchase a “living lettuce”, either at a local grocery store (I bought the one in the photo at Sobeys) or at a market, you can get a second, smaller crop under a single fluorescent tube or LED strip light, the type we use to start bedding plants.
 
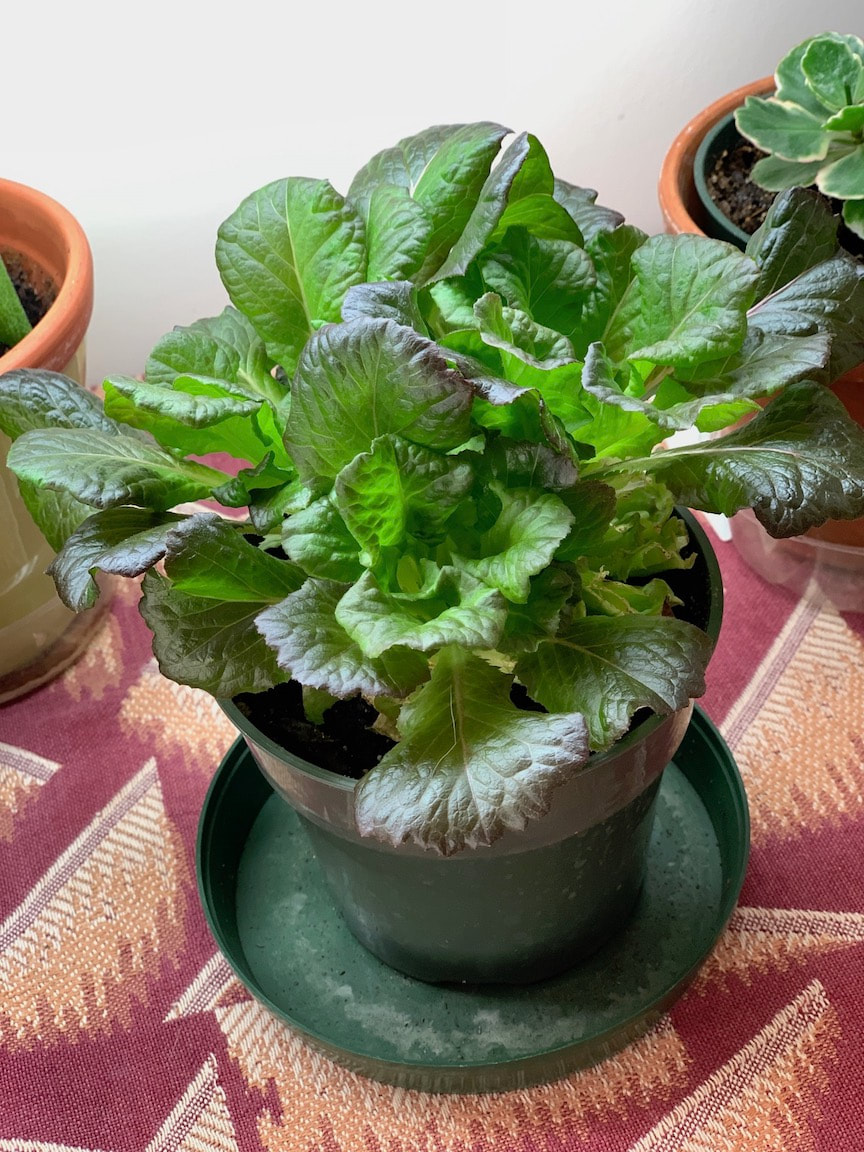
After you cut off the leaves to make a salad, plant the living root into a small pot with some potting mix and give it a wee bit of fertilizer or work some worm castings into the mix before planting. In 3-4 weeks, the leaves might be big enough for a small harvest. This is a fun activity to try with children!

For more information on how these living lettuces are produced, take a peek here.

Crops in Pots

6/26/2020

 
Picture
When you’re itching to plant and the weather doesn’t cooperate, growing leafy greens in containers is a great project, especially if you have a part shade location. Here are some crops that are doing well for me so far this year.

In early May, I seeded a Lettuce blend and Arugula in a shallow plastic planter filled with potting mix and a bit of compost (see tips below). Flea beetles are often a problem, attacking arugula and other plants in the mustard and cabbage family, so I kept the bowl inside while these pests were active. Once the cooler weather returned, I moved it outside to the shadier part of our deck. The arugula keeps growing even after a couple of cuttings. The arugula seeds I used are from Mumm’s Seeds, technically a package of seeds for growing indoors as microgreens. I was so thrilled with the success, I recently seeded more arugula into a pot that earlier produced a nice crop of spinach (see more info on this container below).

Another wonderful crop is Kale. This fast grower likes a good amount of soil depth. I grew a “baby kale” crop in a very shallow dish in March/April. It was nice to have something green but the growth was meager compared to the Curly Kale enjoying the extra space and proper daylight in part shade on the deck. Cabbage Butterflies will visit, so you either have to cover the kale or scout for eggs and caterpillars. BTK is an insecticide approved for organic food growing, available in garden centres or Canadian Tire. I use this bacteria-based product only for cabbage crops that are not easy to cover with fabric because it will kill all caterpillars, including those of butterflies we enjoy seeing around.

Swiss Chard takes a while to grow and now I’m finding some damage from Leaf Miners. The larvae feed and defecate between leaf layers, making the leaves rather unappetizing. Leaf miner adults are in the fly family and burrow into the soil. You can mulch the soil around your plants with newspaper to reduce the chance the flies can lay eggs and to prevent the pupae from emerging. You can also cover the crop with floating row cover. Inspect your leaves and crush any clusters of tiny white eggs.

Pak Choi and Napa Cabbage are quite easy to start from seed as well. I grew them in a plastic 6-pack of potting mix under a Sunblaster T5 light, then transplanted them into containers. Both crops are favorite snacks of Flea Beetles. I covered the Pak Choi with floating row cover and kept the Napa Cabbage in a sunny window until the Flea Beetles disappeared (maybe they found tastier Canola crops?). The Pak Choi is ready for harvest while the Napa Cabbage will need another couple of weeks to fill out.

Herbs like basil, dill and parsley work well from seed in containers but thyme, sage, oregano, rosemary and mint take a long time and are easier by purchasing a plant. Cilantro is ok, but seems to flower very quickly – it prefers a cool and moist spot in the garden.

Ideal Pot Size: Larger containers remain damp longer, so use the lightest, largest pot you can afford and still move if necessary. You generally need 12-18 inches of soil depth. Very tall, narrow pots dry out and drain fast. For non-edibles, I bottom fill deep pots with chunks of Styrofoam or empty pop bottles, then top that with landscape fabric and potting mix.

Container Materials: Clay is beautiful but can be heavy. Glazed pots do not dry out as fast in our climate and work well as long as you empty or cover them after the soil is dry in the fall. Wet soil expands when it freezes and could crack your pot. I love using glazed clay pots to complement beautiful flowers or herbs.
Plastic is light and available in many sizes and colours. Plastic works well for vegetables, as you can easily move the pots from sun to shelter. It can be relatively easy to clip on covers to protect your crops from pests or cold. Black plastic pots heat up, which is useful for growing peppers and sweet potatoes. Self-watering bucket planters are really great for a single tomato plant, whereas a self-watering Earthbox can accommodate 2 small tomatoes or a row of 4 small Pak Choi plants (and it’s not too difficult to cover this crop to protect them from flea beetles). Earthboxes have a staking kit option that works great for cucumbers. The relatively higher investment cost of an Earthbox with wheels is worth it for folks with limited space and a need to move the containers around with ease.

Plastic containers are great for a children’s project. The containers in my photo above were painted last spring by a group of garden club kids at Windsor Park School. I brush off flaky paint, then put on a new coat of white or beige paint. Once dry, I let the children decorate the container with child safe craft paint before we plant flowers. This spring, garden club was of course cancelled, so I planted some spinach in one of the pots and transplanted wild strawberries into the other. It reminds me of the wonderful garden club hours we can hopefully enjoy again in 2021.

Potting Mix (“soil”): Containers need to be filled with potting mix, not soil or “dirt”. Potting mix is a blend of peat moss (and may contain coconut choir), perlite and vermiculite. These materials help plant roots anchor and grow, but it does not become hard and heavy. For nutrition, you can add about 25% compost by volume, plus some worm castings and you will need to add fertilizer. I use an organic, granular veggie fertilizer when I plant and then water with some fish or seaweed fertilizer once in a while. This provides a little bit of a faster boost and adds nutrients that may not be present in the granular fertilizer.
(Click on photos to see larger image)

Reusing Your Potting Mix

5/26/2017

 
Picture
I love growing food in containers as it allows for earlier growth. Also, you can take advantage of some sunny spots where you can’t have a garden bed, and some containers can be moved into the garage or house when an early fall frost threatens.
For containers, we can’t use garden soil because it’s heavy and hard. Potting mix is made from peat moss, vermiculite and perlite. While it’s light and holds water quite well, peat moss comes from our precious wetlands that are drained for harvest. Coconut choir is an option but it comes from very far away and has its own challenges. Therefore, I like to reuse my potting mix for as long as possible.
In the fall, I remove the plants, let the mix dry out and place the containers in a shed or under the waterproof deck. This is important for containers that might crack when the potting mix freezes.
In the spring, I dump all the containers out onto a tarp on the lawn (some grass is a useful work surface…). Then I usually mix in compost, up to about 20-30% of the total volume, and I re-moisten the dry mix.
This spring, I found that my potting mix seemed very dense and heavy. Since I also add compost, some worm castings and I use organic fertilizer, I think all kinds of microbes are happy in my containers. They are composting organic materials, which means that some good soil building is going on. This is a bit of speculation on my part as I don’t have the tools or skill to prove it.
I decided to purchase some perlite, a volcanic rock rich in silicon that is heated to expand the particles (see white perlite in photo). This creates important air spaces in the potting mix. Perlite also holds water, but less than vermiculite, another mineral that's part of most potting mixes. I used a shovel to mix the perlite thoroughly into the reused potting mix before watering and adding the growing medium back into my containers. Since the mix does not contain a lot of nutrients (other than what’s in the compost), I add a granular organic fertilizer to each planter at transplanting time.

    Author

    Claudia is exploring and sharing permaculture ideas in Edmonton.

    Categories

    All
    Cold Frame
    Composting
    Container Growing
    Extending The Season
    Extreme Weather
    Farming
    Food
    Fruit Trees
    Harvest
    Herbs
    Indoor Growing
    Lasagna Garden
    Native Plants
    Perennial Greens
    Permaculture Principles
    Pests
    Pollinators
    Root Cellar
    Row Cover
    Seeds
    Sheet Mulching
    Soil Tips
    Supporting Plants
    Vegetables
    Wildlife

    Archives

    March 2022
    February 2022
    October 2021
    September 2021
    March 2021
    September 2020
    June 2020
    April 2020
    March 2019
    January 2019
    September 2018
    March 2018
    August 2017
    July 2017
    May 2017
    April 2017
    February 2017
    January 2017
    November 2016
    July 2016
    June 2016
    May 2016
    April 2016
    March 2016
    January 2016
    December 2015
    November 2015
    September 2015
    July 2015
    May 2015
    February 2015
    October 2014
    July 2014
    June 2014
    March 2014
    December 2013
    October 2013
    June 2013
    May 2013
    January 2013
    July 2012
    June 2012
    March 2012
    January 2012
    September 2011
    June 2011
    May 2011
    February 2011
    January 2011

    RSS Feed

© 2022 Wild Green Garden Consulting
Sign Up     Home     Consultations     Permaculture Design