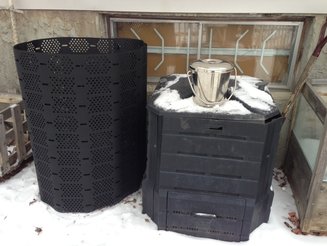
 GEOBIN on the left, Soil Saver compost bin on the right.
 Here are some basic suggestions to encourage you to start now and to continue throughout the winter.
In urban yards, an enclosed compost bin to collect materials is best, as opposed to throwing kitchen waste onto a heap.
Step 1: Make a wooden bin or purchase a large plastic bin. Make sure you get a bin that is wider than 24 inches and not too tall, otherwise it’s very difficult to turn the contents. (Note: Most people find the “Garden Gourmet too tall and narrow, which makes it difficult to turn and it also dries out too quickly).
Step 2: Place the bin on a fairly level surface in your yard. Make sure it’s fairly easy to get to your bin through snow and in cold weather. Ideally, the bin is placed in part sun to help speed up the decomposition. It’s also helpful to place it near a source of water during the summer, such as a rainbarrel. Avoid placing your compost bin on concrete.
Step 3: Collect your kitchen waste in a nice bucket. Lee Valley has conveniently sized metal buckets. Collect veggies and fruit, eggshells, tea and coffee grounds. Avoid dairy products, fat, meat, eggs and pet waste in this kind of open, aerobic composting method.
Step 4: Throw the kitchen waste into your compost bin every few days. Ideally, you should balance all these “greens” (fresh materials that contain lots of nitrogen) with “browns” (dry leaves, straw, and shredded paper that contain lots of carbon). In the winter, if you didn’t save your leaves, you can shred some newspaper and mix it with your green material. If you have storage space, you can purchase a square bale of straw at a local garden centre. (Straw is also fabulous to mulch your veggie beds in the summer.) Next fall, be sure to collect bags of dry leaves and store them near your compost.
For every 1 bucket of “greens”, add 1-2 buckets of “browns”. This is more important during the warm season when the microbes become active.
Step 5: If your bin is full, you may want to add a temporary bin, such as a wire cage (line it with cardboard to retain moisture and prevent materials from falling out). I have recently purchased a roll of plastic, a “Geobin” from Lee Valley, as an extension to my regular bin. It’s easy to set up and I’m hoping it will retain more humidity and keep in the small bits.
Step 6: From December to March, your compost is likely not very active, so you can just keep adding materials. In April, use a fork to turn the compost and if necessary, add some water. The materials should be like a wrung out sponge. Turn the compost every couple of weeks or so. Ideally, you will not add any new materials to this bin to allow the microbes to decompose everything by fall. Set up a second compost bin for all your summer kitchen waste and garden clean up materials.
Step 7: In the fall, sift the materials from your first bin and add the finished compost to your garden. Any materials that have not decomposed to your satisfaction can be added to your fall pile (see next step).
Step 8: In October, it’s fall cleanup and compost mixing time. Empty out the summer compost bin, mix it with plenty of fall leaves, fresh kitchen waste and the yard waste from fall cleanup. Ideally, you will combine 2 parts of loose, dry leaves or straw with 1 part green materials from the garden. Mix and add water to the point where the materials resemble a wrung out sponge. Place all the materials into one of your bins and turn them every 5 days until everything is frozen. Now we’re back to Step 4 – add your kitchen waste all winter long!
 RSS Feed