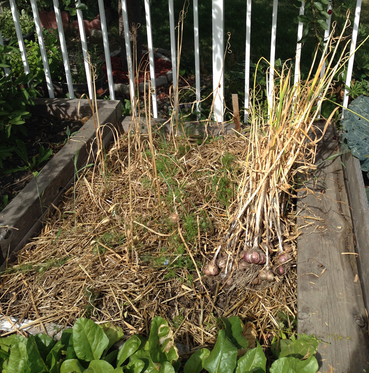
If you are confused about bugs driving you crazy in your home, you are not alone. Fruit flies and fungus gnats are likely what you are swatting but where do they come from and what can you do? Fungus gnats are very small black flies – their eggs are in potting mix, and so they come with your potted plants or the mix you purchase for repotting your plants. The larvae feed on organic matter in the soil and don’t usually damage your plants. You can hang up yellow sticky traps to catch the flying adults and reduce their numbers. You can also purchase diatomaceous earth and dig the white powder into the top layer of your potted plants and stir it into potting mix when planting or transplanting. Some people have moderate success with placing a layer of sand or grit on top of the soil. Another useful product is Growstone Gnat Nix, a recycled glass product that you spread on top of the soil. You can find it at some garden centers or online. None of these tricks are 100% successful, especially if you keep the pots continually moist. Let your pots dry out between watering to reduce the success of the pesky gnats. 
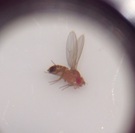
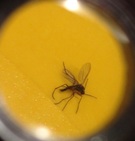
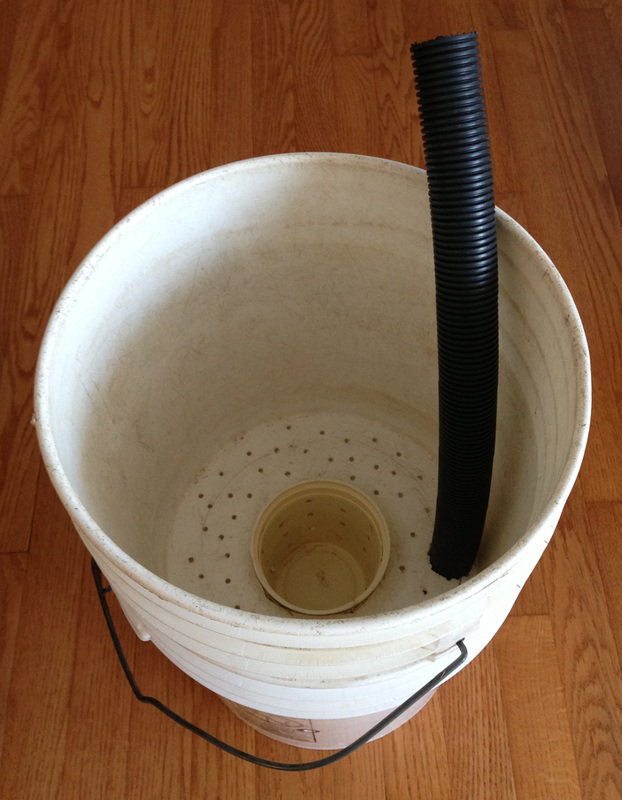
Fruit flies hatch from the peel of fruit. If you have a compost or garbage bin that has not been emptied in a while, you might see the odd fruit fly in your house. If you like to compost with red wiggler worms, it’s best to avoid feeding them banana peels or citrus fruit. Once you have an outbreak of fruit flies in your worm bin, it’s almost impossible to get rid of them.
We crave fresh greens in early spring but around here, not much grows until May. At the other end, our season generally finishes in late October. While that’s a 6-month growing season, most of us find the winter long and the local, seasonal produce quite limited after our gardens go to sleep. So what can you do to get some quick greens in spring, and again after the summer heat into fall? Here are 3 ideas for fall, spring and summer. 1. Spring Greens – make plans in the fall In early spring, dandelions and stinging nettle cut from an area that is not sprayed will add some great nutrition to a salad, and if you have enough space, asparagus can do very well in Alberta. A very early perennial green is Sorrel, a clumping plant that produces slightly sour leaves resembling spinach. I have seen Sorrel poke out around April 15. While it’s too sour in a salad by itself, you can add it to your store-bought salad mix. Asparagus and Sorrel are available for purchase and planting in early spring. The best way to have some early spinach and lettuce is to seed these crops in the fall before snow falls. Once the weather warms up in May, spinach grows very quickly, followed by the lettuce. If you plant lettuce and other greens in a cold frame in the fall or very early spring, you may be able to harvest a little bit earlier yet. 2. Early Summer Veggie Planter – plant in early May Spring is a tricky time for transplanting vegetable seedlings or flowers outside because we can get some very chilly nights almost until the end of May. I also find that pesky flea beetles love young arugula, mustards, radish and bok choi or any of the Asian salad mixes. So here is a way to produce bok choi, napa cabbage, kale or other greens quickly and fairly safe from flea beetles. In late April or early May, some garden centres or hardware stores (i.e. Rona, Home Depot) bring in 6-packs of these vegetables. I prefer to support locally owned garden centres, but sometimes the hardware stores have veggies shipped a bit early – if you spot them before they look awful due to neglect, they will do very well. Choose a container or planter that is easy to move into the garage or house, should the weather turn ugly. Fill it with potting mix, and add compost and an organic fertilizer for nutrition. Transplant the seedlings (i.e., bok choi) into your container and cover them with floating row cover. This will protect the seedlings from pests and create some extra warmth. In early to mid-June, you will have some fresh greens from your container garden. 3. Greens until November in a Cold Frame – plant in mid- to late August This past summer, my garlic was ready for harvest at the end of August. After I had pulled the garlic, I placed a cold frame on that open ground, added a little bit of organic fertilizer and seeded a mix of arugula, lettuce and kale inside the cold frame on Aug 28. The cooler weather allowed the arugula to grow very quickly. I did not see much of the lettuce, and the kale was also sparse for a while. While temperatures started dipping toward the freezing mark in early October, the greens continued to grow and we enjoyed some fresh salads in mid-October. In the cold frame, the arugula did not seem to be affected by –5 degrees C overnight in early November, but on November 14, we picked the last bowl of lovely arugula. It was great to have the greens so late into the season! Garlic is harvested when the stalks of the plant are drying up and have turned brown. Dig up your garlic and store the entire plant in a dry location (i.e., your garage) for about two weeks. Decide how many bulbs you will eat and how many new bulbs you want for next year. Each clove will make a new bulb, so reserve enough bulbs to plant this fall. Since you should rotate your crops, decide where you will plant the garlic. Remember, this bed will need to be well marked and can’t be disturbed for a full year. In late September, break apart your planting bulbs and plant each clove with the pointy end up, approximately 15 cm (6 inches) apart and about 7 cm (3 inches) deep. Water them a couple of times if it’s very dry and it helps to mulch the garlic with straw. If you decide not to mulch, you can seed some lettuce between the garlic before snow falls and you will have an early crop of cutting lettuce. After 3 years of impressive growth, I’m very happy with my Borealis and Cinderella haskap (honeyberry) bushes. The shrubs are now 4 feet tall and wide, and will likely grow another foot or so. This year I was able to harvest about 3 litres of fruit, most of which I spread out on cookie sheets to freeze. I have made a few mini-tarts and we have also enjoyed them fresh with ice cream and mixed into pancake batter. It’s a good idea to protect young plants in the winter with wire cages as hungry rabbits go after the stems. Another critter that loves the shrubs this summer is the Wee Harlequin Bug, aka Twice-stabbed Stink Bug.
When picking berries, I ended up with bugs in my hands and noticed that many berries were soft, indicating the bugs had been sucking out the juice. I have also been finding Wee Harlequin Bugs (see photo above) on many flowers, often breeding back to back. Apparently they love seeds but from what I have observed, it seems that they cause damage to developing flowers, which then dry up very quickly. A while ago, I found eggs on my tomato stems – they are yellow, hard and in neat rows. On some of the developing flowers, I found tiny larvae in search of food and again, the flowers have already dried up. Some of my ripening tomatoes have a yellow, soft patch, more evidence of Wee Harlequin Bugs sucking juice. So what can we do? When I catch a few bugs while doing watering or other garden care, I place them on a hard surface and squish them with my shoe. I have also gone out with a bucket of soapy water and tried to collect them en masse. (One of my organic gardening students took the shop vac to suck them off the raspberry bushes – pretty creative). According to online info (see Rob Sproule’s article), the bugs will try to overwinter under leaf litter and mulch. As a strong advocate of mulching (since it does wonders in drought years and to feed the soil!), I’m not sure that I will have the heart to “remove plant litter” from my entire yard. It’s likely a good idea to dispose of any heavily infested plants and cut off seed heads that are not being saved. We have all been feeling the effects of this early drought and the summer may turn out to be rather hot and dry. Apart from the chapped lips and continual dust everywhere, I’ve noticed dry soil pulling away from sidewalks, and lots of early flowering and heavy pollen load.
There are several strategies for dealing with drought:
For the holidays, I received a great book called “Bitter – A Taste of the World’s Most Dangerous Flavor, with Recipes” by Jennifer McLagan. One of the chapters is all about bitter greens, such as Dandelion (!), Endive, Chicory and Radicchio. I was thrilled, as I happen to be growing Radicchio in my dark cold storage. Radicchio is in the Chicory family and has beautiful, red or greenish-red leaves. In stores, you will find small tight heads that look a little bit like a purple cabbage. Radicchio is often added to salads but there are also lots of cooked recipes. The wild form of this plant, Cichorium intybus, grows in some of the warmer provinces – you might have noticed tall stems with lovely blue flowers along the roadsides. In the last couple of years, I have started Radicchio from seed indoors and transplanted it outside in early June. It produces lots of green leaves and they are very bitter and not palatable. Later in the fall, it is supposed to start making heads. That has not been the case in my yard, but I was inspired to move the plants indoors for winter forcing by Denise, a lovely woman we visited as part of the Edible Garden Tour. Denise also told us how to keep carrots in the garden into winter. For winter forcing, I dig up the plants in mid-October, gently knock off the soil and transplant them into small pots with some potting mix. I cut off the greens, leaving just a centimeter of stub or so. I do not add any water and place them in my “cold room”, a dark room that does not get heated in our basement. I check the plants once in a while and when they start growing, I add a little bit of water. Usually in December small heads begin to form. Once they are cut off, a smaller crop of leaves can be harvested again. I am looking forward to trying this again next year with more plants and different varieties. I also read that this works with Dandelion – that should be a fun experiment! Can you grow melons in Edmonton? Yes, in a protected spot we can grow musk melons (cantaloupe) and possibly other types. Last spring, after turning the compost pile a few more times and moving it to a different location, I mixed some partially finished compost with potting mix and enclosed it with two layers of old bricks for a temporary circular bed. I purchased a musk melon seedling at a local garden centre and planted it into the circular bed around June 1. We had some very cool weather, so I protected it with a plastic cloche in the same way I protected my zucchini. In late August, the melon had sprawled all over and I located 5 melons. Unfortunately, I had to bring them inside as we had a forecast of frost and some snow on September 7. This past week, the melons finally looked and smelled ripe enough to try – although not overly sweet, they were a nice home-grown melon treat. I like experimenting with edible plants in my garden and this year, I decided to seed Salad Burnet and Strawberry Spinach (aka Strawberry Blite) to add to our salads. I started both plants indoors in early May and transplanted them outside around mid-June. In late June, I left for a trip to Switzerland and was pleasantly surprised how much the plants had grown in three weeks, and that they were ready for picking! Salad Burnet is a perennial plant native to Europe (I actually found it while walking in a meadow near my home town in northern Switzerland). It is marginally hardy but some previous plantings in other parts of my garden have mostly survived for several years. I purchased the seeds at Seedy Sunday a few years ago from Brother Nature, www.brothernature.ca. This spring I seeded another batch indoors in early April. I decided to plant the new seedlings close to my honeyberry shrubs as that bed is in part shade and fairly moist. In mid-July, the plants were fully grown and already started making seed heads. The leaves have a slight cucumber flavor and I also think they taste slightly nutty. They are best harvested when the leaves are young and soft. Although we have been enjoying them in salads in July, the leaves will soon be a bit tough. Salad Burnet stays in a nice clump but re-seeds slowly. Strawberry Spinach is a native plant of Alberta and it was used by the First Nations for food and the red fruit was also used as a dye. The plant is in the Goosefoot family, so it’s related to Lamb’s Quarters. The leaves and fruit are edible, though they contain oxalic acid and should not be consumed in substantial quantities. The seeds I purchased are from McKenzie Seeds purchased at a local garden centre. I started the seeds indoors in mid-April and transplanted them out into the garden some time in June. Since our return from holidays in mid-July, we have been adding the “berries” to salads. The fruits do not have a lot of flavor – I would describe them as slightly juicy and nutty. When added to a spinach salad, they look like a bit like strawberries and also release tiny black seeds similar to poppy seeds. It’s certainly a conversation piece! A word of caution – although the seed packages states that this annual plant re-seeds, some online research has brought up the following comments “May re-seed vigorously”. Yikes. I will be harvesting a few more berries and the rest will go in the garbage, to be composted by the City. I know I have dropped quite a few fruits already and do not want my veggie plot taken over by this plant next year. It might be safer in a large pot on a patio where stray seeds can be swept up. The lesson? Know your plants before bringing them into your yard! Two easy permaculture principles to try out in an urban yard are to “catch and store energy and materials” and to “use biological and renewable resources”. This year I decided to put my red wrigglers to work in the garden. I found a used plant pot and drilled some holes around the sides, then sunk it into a raised bed between a zucchini and tomato plant. Next I put in some leaves and kitchen scraps – bedding and food for my worms. I placed a handful of worms from my indoor worm bin inside the new home and covered them with more leaves. Finally, I covered the “worm home” with a piece of tree stump to create a roof. Voilà! I now have a fertilizer generator and kitchen waste processing plant right next to nutrient hungry plants.
We certainly can’t complain about the different vegetables we can grow in Edmonton! I recently reviewed a list in preparation for my spring gardening classes – there are at least 26 kinds of veggies we can grow! Some are a little trickier than others because they grow best with lots of heat, such as pepper, tomatoes and eggplant. There are a few methods to extend the growing time for these plants, including growing them in containers. These can be moved in and out of the house or garage to avoid early or late season frosts and they can also be placed in a location that is more protected and warmer than the rest of the yard. I have a number of containers, two of which work really well for the purpose of extending the growing season. They are containers with sub-irrigation, featuring a water reservoir at the bottom and the plant roots have access to ample water as long as you replenish the reservoir once in a while. This year I grew two different kinds of eggplant in an EarthBox. This sturdy plastic container is fairly stylish and comes with coasters, which makes it easy to move and turn as needed. Although I follow the setup instructions from the manufacturer fairly closely, I do add some compost and worm castings to introduce microbes into the system. These boxes are not cheap, but they should last ‘forever’ and are great for people with limited space or for keeners who want to try a specialty crop. I have also made a cheaper version of this system with two buckets, a yoghurt container and a piece of plastic tubing. Using a jigsaw, I cut a hole the size of the 650 mL yoghurt container in the bottom of the first bucket. I also drilled 5mm holes all over the rest of the bottom of that first bucket. Then I riddled the sides of the yoghurt container with holes and placed it in the bottom hole of the bucket. The potting mix in the yoghurt container sits in the water reservoir and therefore wicks water up into the rest of the potting mix. I also cut an additional hole for the plastic tube in the first bucket. The tube is pushed into the hole and all the way down to the bottom. The first bucket is then set inside the second bucket and watering is done into the plastic tube to fill the reservoir at the bottom. You also need an overflow hole so you can’t fill overfill the reservoir. For other instructions, you can google “Global Buckets” and you will find many ways inventive folks have created their own version of a sub-irrigated container. |
AuthorClaudia is exploring and sharing permaculture ideas in Edmonton. Categories
All
Archives
March 2022
|
© 2024 Wild Green Garden Consulting
|